Wednesday, 27 February 2019
OSPF(Open Short Path First) Routing with IPV6
OSPF(Open Short Path First) Routing with IPV6
For ipv4 Routing or for more details → click here
Diagram
Router 2811 and switch 2950T

Basic Configuration,clock rate and bandwidth
Go to First RouterRouter>en
Router#conf t
Router(config)#int s0/0/0
Router(config-if)#ipv6 address 2002::1/64
Router(config-if)#no shut
Router(config-if)#clock rate 64000
Router(config-if)#bandwidth 1000
Router(config-if)#exit
Router(config)#int f0/0
Router(config-if)#ipv6 address 2001::1/64
Router(config-if)#no shut
Go to second Router
Router>en
Router#conf t
Router(config)#int s0/0/0
Router(config-if)#ipv6 address 2002::2/64
Router(config-if)#no shut
Router(config-if)#bandwidth 1000
Router(config-if)#exit
Router(config)#int f0/0
Router(config-if)#ipv6 address 2003::1/64
Router(config-if)#no shut
Now Routing
1. in routing use Product ID (10) which is similar in all router
2. router-id which is different in all router.
in first router we use 1.1.1.1
in second router use 2.2.2.2
3. In ospf also use area no. area 0 is backbone of network.
NOW
Go to first router
First create group
Router(config)#ipv6 unicast-routing
Router(config)#ipv6 router osfp 10
Router(config-rtr)#router-id 1.1.1.1
Router(config-rtr)#exit
Now add port's of router in group
Router(config)#int s0/0/0
Router(config-if)#ipv6 ospf 10 area 0
Router(config-if)#exit
Router(config)#int f0/0
Router(config-if)#ipv6 ospf 10 area 0
Router(config-if)#exit
Now go to second router
Same as router first
or
First create group
Router(config)#ipv6 unicast-routing
Router(config)#ipv6 router osfp 10
Router(config-rtr)#router-id 2.2.2.2
Router(config-rtr)#exit
Now add port's of router in group
Router(config)#ipv6 router osfp 10
Router(config-rtr)#router-id 2.2.2.2
Router(config-rtr)#exit
Now add port's of router in group
Router(config)#int s0/0/0
Router(config-if)#ipv6 ospf 10 area 0
Router(config-if)#exit
Router(config)#int f0/0
Router(config-if)#ipv6 ospf 10 area 0
Router(config-if)#exit
Router(config-if)#ipv6 ospf 10 area 0
Router(config-if)#exit
Router(config)#int f0/0
Router(config-if)#ipv6 ospf 10 area 0
Router(config-if)#exit
Now checking
Send packet from one router to another router. or ping all ip
------------------END----------------------
------------------END----------------------
IPV6-EIGRP ROUTING
IPV6-EIGRP ROUTING
in ipv4 routing or more details → click here
Diagram
Router 2811 and switch 2950T
Basic Configuration,clock rate and bandwidth
Go to First RouterRouter>en
Router#conf t
Router(config)#int s0/0/0
Router(config-if)#ipv6 address 2002::1/64
Router(config-if)#no shut
Router(config-if)#clock rate 64000
Router(config-if)#bandwidth 1000
Router(config-if)#exit
Router(config)#int f0/0
Router(config-if)#ipv6 address 2001::1/64
Router(config-if)#no shut
Go to second Router
Router>en
Router#conf t
Router(config)#int s0/0/0
Router(config-if)#ipv6 address 2002::2/64
Router(config-if)#no shut
Router(config-if)#bandwidth 1000
Router(config-if)#exit
Router(config)#int f0/0
Router(config-if)#ipv6 address 2003::1/64
Router(config-if)#no shut
Now Routing
in routing use autonomous no. (10) which is similar in all router
and router-id which is different in all router.
in first router we use 1.1.1.1
in second router use 2.2.2.2.
NOW
Go to first router
First create group
Router(config)#ipv6 unicast-routing
Router(config)#ipv6 router eigrp 10
Router(config-rtr)#eigrp router-id 1.1.1.1
Router(config-rtr)#no shut
Router(config-rtr)#exit
Now add port's of router in group
Router(config)#int s0/0/0
Router(config-if)#ipv6 eigrp 10
Router(config-if)#exit
Router(config)#int f0/0
Router(config-if)#ipv6 eigrp 10
Router(config-if)#exit
Now to second Router
Same as First router
or
First create group
Router(config)#ipv6 unicast-routing
Router(config)#ipv6 router eigrp 10
Router(config-rtr)#eigrp router-id 2.2.2.2
Router(config-rtr)#no shut
Router(config-rtr)#exit
Now add port's of router in group
Router(config)#int s0/0/0
Router(config-if)#ipv6 eigrp 10
Router(config-if)#exit
Router(config)#int f0/0
Router(config-if)#ipv6 eigrp 10
Router(config-if)#exit
Now checking
Send packet from one router to another router. or ping all ip
------------------END----------------------
Monday, 25 February 2019
RIP Protocol By IPV6 Configuration
RIP Protocol By IPV6 Configuration
For intro RIP → chick here
Basic Configuration,Bandwidth And Clock Rate
First router(2811) and add port(WIC-2T) and According to Following Diagram

Go to First Router
Router#conf t
Router(config)#ipv6 unicast-routing
Router(config)#int s0/0/0
Router(config-if)#ipv6 address 2002::1/64
Router(config-if)#cl rate 64000
Router(config-if)#bandwidth 1000
Router(config-if)#no shut
Router(config)#int f0/0
Router(config-if)#ipv6 address 2000::1/64
Router(config-if)#no shut
Go to second Router
Router#conf t
Router(config)#ipv6 unicast-routing
Router(config)#int s0/0/0
Router(config-if)#ipv6 address 2002::2/64
Router(config-if)#bandwidth 1000
Router(config-if)#no shut
Router(config)#int f0/0
Router(config-if)#ipv6 address 2001::1/64
Router(config-if)#no shut
Now Routing
First Create a group of same name in all router and add serial and fast ethernet port in these group.
Go to First router
Router(config)#ipv6 router rip iant → these command is used for to create group
Router(config-rtr)#exit
Router(config)#int s0/0/0
Router(config-if)#ipv6 rip iant enable → These command is used for to add these port in group.
Router(config-if)#exit
Router(config)#
Router(config)#int f0/0
Router(config-if)#ipv6 rip iant enable → These command is used for to add these port in group.
Router(config-if)#exit
Same as Router Second
Router(config)#ipv6 router rip iant → these command is used for to create group
Router(config-rtr)#exit
Router(config)#int s0/0/0
Router(config-if)#ipv6 rip iant enable → These command is used for to add these port in group.
Router(config-if)#exit
Router(config)#
Router(config)#int f0/0
Router(config-if)#ipv6 rip iant enable → These command is used for to add these port in group.
Router(config-if)#exit
Now testing
sending packet form one network to another network and check successful sms
or ping form one router to all IP as shown in Diagram.

------------------END---------------------
Router(config-rtr)#exit
Router(config)#int s0/0/0
Router(config-if)#ipv6 rip iant enable → These command is used for to add these port in group.
Router(config-if)#exit
Router(config)#
Router(config)#int f0/0
Router(config-if)#ipv6 rip iant enable → These command is used for to add these port in group.
Router(config-if)#exit
Same as Router Second
Router(config)#ipv6 router rip iant → these command is used for to create group
Router(config-rtr)#exit
Router(config)#int s0/0/0
Router(config-if)#ipv6 rip iant enable → These command is used for to add these port in group.
Router(config-if)#exit
Router(config)#
Router(config)#int f0/0
Router(config-if)#ipv6 rip iant enable → These command is used for to add these port in group.
Router(config-if)#exit
Now testing
sending packet form one network to another network and check successful sms
or ping form one router to all IP as shown in Diagram.

------------------END---------------------
Tuesday, 19 February 2019
Frame Relay
WAN

Router#conf t
Router(config)#int s0/0/0
Router(config-if)#encapsulation frame-relay
Router(config-if)#frame-relay interface-dlci 100
Router(config-if)#frame-relay lmi-type cisco
Router(config-if)#ip address 192.168.30.1 255.255.255.0
Router(config-if)#no shut
Router(config-if)#ex
Router(config)#int f0/0
Router(config-if)#ip address 192.168.10.1 255.255.255.0
Router(config-if)#no shut
Router#conf t
Router(config)#int s0/0/0
Router(config-if)#encapsulation frame-relay
Router(config-if)#frame-relay interface-dlci 110
Router(config-if)#frame-relay lmi-type cisco
Router(config-if)#ip address 192.168.30.2 255.255.255.0
Router(config-if)#no shut
Router(config-if)#ex
Router(config)#int f0/0
Router(config-if)#ip address 192.168.20.1 255.255.255.0
Router(config-if)#no shut


1.
Wan Network connect two or more. LAN network
2.
To create WAN network There are three type of
line/cables.
a. DSL
b. Leased
line/serial line/dedicated line
c. Frame
Relay---à under
100KM
DSL (Digital
Subscriber line): -
1.
DSL line is used to transmit digit data our telephone
line.
2.
DSL provide by telecom company
3.
DSL line generally use to connect public network
Leased Line: -
1. It is also
called serial line or dedicated line
2. It is use
for to connected private network
3. It is 20/7
heavy data transfer media
4. These lines
provide by telecom company (ISP)
5. In these
lines there are two protocols are used to help in traffic.
a. PPP (point
to point protocol)
b. HDLC (High
level Data link control protocol)
c. PAP (Password
Authentication Protocol) for protect data
Frame Relay
1. It is
called Packet Switching Technology
2. Frame Relay
work on packet Switching Technology
3. Frame Relay
is less expensive than leased line
4. It is
providing point to point connection
5. It connects
max 4 network
6. It is shown
as a cloud
7. To
configure frame relay use DLCI no. (Data line connection identifier)
8. DLCI no. is
main part of frame relay
9. DLCI no.
given by service provider
Now configure Frame Relay
first Daigram

Basic configuration
Router 2811 and switch 2950-TGo to first router
Router>enRouter#conf t
Router(config)#int s0/0/0
Router(config-if)#encapsulation frame-relay
Router(config-if)#frame-relay interface-dlci 100
Router(config-if)#frame-relay lmi-type cisco
Router(config-if)#ip address 192.168.30.1 255.255.255.0
Router(config-if)#no shut
Router(config-if)#ex
Router(config)#int f0/0
Router(config-if)#ip address 192.168.10.1 255.255.255.0
Router(config-if)#no shut
Now go to second router
Router>enRouter#conf t
Router(config)#int s0/0/0
Router(config-if)#encapsulation frame-relay
Router(config-if)#frame-relay interface-dlci 110
Router(config-if)#frame-relay lmi-type cisco
Router(config-if)#ip address 192.168.30.2 255.255.255.0
Router(config-if)#no shut
Router(config-if)#ex
Router(config)#int f0/0
Router(config-if)#ip address 192.168.20.1 255.255.255.0
Router(config-if)#no shut
Now configure Frame relay
Open cloud and go to serial 0 and follow figure

now go to serial 1

Now to frame relay and Pair port's

Now routing
Go to first router
Router(config)#router rip
Router(config-router)#network 192.168.10.0
Router(config-router)#network 192.168.30.0
Router(config-router)#exit
Go to second router
Router(config)#router rip
Router(config-router)#network 192.168.20.0
Router(config-router)#network 192.168.30.0
Router(config-router)#exit
Router(config-router)#network 192.168.10.0
Router(config-router)#network 192.168.30.0
Router(config-router)#exit
Go to second router
Router(config)#router rip
Router(config-router)#network 192.168.20.0
Router(config-router)#network 192.168.30.0
Router(config-router)#exit
Now testing
send packet from one network to another router

Monday, 18 February 2019
Inter Vlan Configuration
Intervlan
1. Intervlan is used for to
create virtual network in two different ip network.
2. In intervlan ise
dot1q protocol.
3. dot1q protocol is
create the sub interface and divide the virtual local area network.
Diagram

Basic Configuraation:-
Go to first router
Router#conf t
Router(config)#int s0/0
Router(config-if)#ip ad
Router(config-if)#ip address 192.168.30.1 255.255.255.0
Router(config-if)#no shut
Router(config-if)#cl rate 64000
Router(config-if)#exit
Router(config)#int f0/0
Router(config-if)#no shut
Router(config-if)#exit
Now create sub-network
Router(config)#int f0/0.1
Router(config-subif)#encapsulation dot1Q 1
Router(config-subif)#ip address 192.168.10.1 255.255.255.0
Router(config-subif)#no shut
Router(config-subif)#exit
Router(config)#int f0/0.2
Router(config-subif)#encapsulation dot1Q 10
Router(config-subif)#ip address 192.168.6.1 255.255.255.0
Router(config-subif)#no shut
Router(config-subif)#exit
Router(config)#int f0/0.3
Router(config-subif)#encapsulation dot1Q 30
Router(config-subif)#ip address 192.168.5.1 255.255.255.0
Router(config-subif)#no shut
Router(config-subif)#exit
Go to second router
Router>en
Router#conf t
Router(config)#int s0/0
Router(config-if)#ip address 192.168.30.2 255.255.255.0
Router(config-if)#no shut
Router(config)#int f0/0
Router(config-if)#no shut
Router(config-if)#exit
Now create sub-network
Router(config)#int f0/0.1
Router(config-subif)#encapsulation dot1Q 1
Router(config-subif)#ip address 192.168.20.1 255.255.255.0
Router(config-subif)#no shut
Router(config-subif)#exit
Router(config)#int f0/0.2
Router(config-subif)#encapsulation dot1Q 10
Router(config-subif)#ip address 192.168.6.1 255.255.255.0
Router(config-subif)#no shut
Router(config-subif)#exit
Router(config)#int f0/0.3
Router(config-subif)#encapsulation dot1Q 20
Router(config-subif)#ip address 192.168.5.1 255.255.255.0
Router(config-subif)#no shut
Router(config-subif)#exit
Now Switching
go to router first switch
Switch>en
Switch#conf t
Switch(config)#vlan 10
Switch(config-vlan)#name abc
Switch(config-vlan)#exit
Switch(config)#vlan 20
Switch(config-vlan)#name xyz
Switch(config-vlan)#exit
Switch(config)#int f0/2
Switch(config-if)#switchport mode access
Switch(config-if)#switchport access vlan 10
Switch(config-if)#exit
Switch(config)#int f0/3
Switch(config-if)#switchport mode access
Switch(config-if)#switchport access vlan 10
Switch(config-if)#exit
Switch(config-if)#int f0/4
Switch(config-if)#switchport mode access
Switch(config-if)#switchport access vlan 20
Switch(config-if)#exit
Switch(config)#int f0/5
Switch(config-if)#switchport mode access
Switch(config-if)#switchport access vlan 20
Switch(config-if)#exit
go to seconf router switch
Same as above switch
or
Switch>en
Switch#conf t
Switch(config)#vlan 10
Switch(config-vlan)#name abc
Switch(config-vlan)#exit
Switch(config)#vlan 20
Switch(config-vlan)#name xyz
Switch(config-vlan)#exit
Switch(config)#int f0/2
Switch(config-if)#switchport mode access
Switch(config-if)#switchport access vlan 10
Switch(config-if)#exit
Switch(config)#int f0/3
Switch(config-if)#switchport mode access
Switch(config-if)#switchport access vlan 10
Switch(config-if)#exit
Switch(config-if)#int f0/4
Switch(config-if)#switchport mode access
Switch(config-if)#switchport access vlan 20
Switch(config-if)#exit
Switch(config)#int f0/5
Switch(config-if)#switchport mode access
Switch(config-if)#switchport access vlan 20
Switch(config-if)#exit
Now routing with rip
Go to first router
Router(config)#router rip
Router(config-router)#network 192.168.10.0
Router(config-router)#network 192.168.30.0
Router(config-router)#network 192.168.5.0
Router(config-router)#network 192.168.6.0
Go to Second router
Router(config)#router rip
Router(config-router)#network 192.168.20.0
Router(config-router)#network 192.168.30.0
Router(config-router)#network 192.168.5.0
Router(config-router)#network 192.168.6.0
Now give ip to all pc's according to above diagram
Testing
Send packet from all pc. vlan 10 not send able to send packet to vlan 20 in both network so it's fail.
and also vlan 20 pc's not send packet to vlan 10 pc's so it also fail
only same vlan's send packet to each other and they are successfull.
as shown in the figure.

Thursday, 14 February 2019
VLAN (Virtual Local Area Configuration)
VLAN (Virtual Local Area Network)
1. Vlan is
used for to set the security in switch
2. Vlan is provide
to communicate particular PC its particular PC
3. Vlan are of
three type
a Simple Vlan
b Different Vlan
c Inter Vlan
In simple Vlan only one vlan is create.
In Different Vlan two or more then two Vlan is create
In Inter Vlan connection between two or more network and two or more vlan is created.
Simple Vlan
Diagram

Basic Configuration:- Give ip address to all pc's
Switching Configuration:- Go to switch
Switch>enable
Switch#config terminal
Switch(config)#hostname s1
First create vlan
s1(config)#vlan 10
s1(config-vlan)#name iant
s1(config-vlan)#exit
Now add fast ethernet in Vlan
s1(config)#int f0/1
s1(config-if)#switchport mode access
s1(config-if)#switch access vlan 10
s1(config)#int f0/4
s1(config-if)#switchport mode access
s1(config-if)#switchport access vlan 10
s1(config-if)#exit
s1(config)#int f0/7
s1(config-if)#switchport mode access
s1(config-if)#switchport access vlan 10
s1(config-if)#exit
Now check
Send package from pc's
1. allvlan pc's does not send package to other pc's
2. all other pc's does not send package to vlan pc's
3. only non-vlan success send package to each other and vlan pc's send package to each other.
As Shown in the Diagram

2. all other pc's does not send package to vlan pc's
3. only non-vlan success send package to each other and vlan pc's send package to each other.
As Shown in the Diagram

Wednesday, 13 February 2019
Router Password
Router Password
There are three type of password set in Router.
1. Enable Password
2. Console Password
3. Telnet Password
Enable Password
These is First mode of router.
It is set for enable mode
HOW TO SET
go to router
Router>enable
Router#config t
Router(config)#enable secret 123456 ------ password
Router>enable
Router#config t#exit
TO check
exit all terminal and re-enter in console terminal
Router>enable
Password ----------- this is shown after set password
It is set for enable mode
HOW TO SET
go to router
Router>enable
Router#config t
Router(config)#enable secret 123456 ------ password
Router>enable
Router#config t#exit
TO check
exit all terminal and re-enter in console terminal
Router>enable
Password ----------- this is shown after set password
Console Password
These password is used for router excess in P.C.
Router>enable
Router#config t
Router(config)#line console 0
Router(config-line)#password abc ----- password
Router(config-line)#login
To check
exit from all terminal and restart
Password ---- before Router> terminal
Router#config t
Router(config)#line console 0
Router(config-line)#password abc ----- password
Router(config-line)#login
To check
exit from all terminal and restart
Password ---- before Router> terminal
Telnet Password or Virtual teletype Password (VTY)
It is use when you remote access to another router.
Router>enable
Router#config t
Router(config)#line vty 0 4
Router(config-line)#password 123 ----- password
Router(config-line)#login
To Check
go to another router and run some command
Router>en
Router#telnet another router ip.
Password ------ shown in this router.
-----------------END--------------------
Router#config t
Router(config)#line vty 0 4
Router(config-line)#password 123 ----- password
Router(config-line)#login
To Check
go to another router and run some command
Router>en
Router#telnet another router ip.
Password ------ shown in this router.
How to remove password
1.
Enable:-Router(config)#no enable password
2.
Console:- Router(config)#line console 0
Router(config-line)#no password
Router(config-line)#login
3.
Vty:- Router(config)#line vty 0 4
Router(config-line)#no password
Router(config-line)#login
Tuesday, 12 February 2019
OSPF(Open Short Path First) Routing
OSPF(Open Short Path First)
1. It is dynamic routing
Protocol. It is also known as link straight protocol
2. OSPF is classless
routing protocol. Support CIDR Network.
3. OSPF protocol design
and develop by IAB (Internet Articture Board) and IETF (Internet
Engineer Task Force)
4. OSPF Route the packet
up to infinity hope {infinity network support}
5. OSPF is use LSA (Link
Stay Advertisement)
LSA
are of 9 Type
LSA-1 is
in CCNA
And other
from 2-9 are in CCNP
6. OSPF Use Process ID,
Process ID mask match between neighbors router
7. Process ID range is
between 1 to 65535.
8. OSPF is use area no.,
Area no. zero is backbone Area
9. OSPF Configuration
also support wild card mask. Wild card mask is just opposite of subnet mask
For EX.:-
255.255.255.0
-255.255.255.255
————————
0.0.0.255
NOW CONFIGURATION:-
Now Diagram
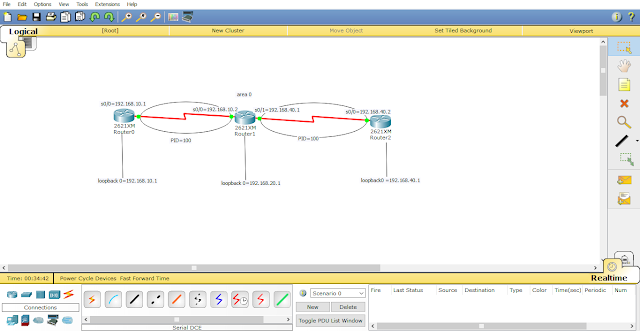
Step#1 Basic Configuration:-
Go to First Router
Router>enable
Router#configure terminal
Router(config)#interface Serial0/0
Router(config-if)#ip address 192.168.30.1 255.255.255.0
Router(config-if)#no shutdown
Router(config-if)#clock rate 64000
Router(config-if)#exit
Router(config)#int loopback 0
Router(config-if)#ip address 192.168.10.1 255.255.255.0
Router(config-if)#exit
Go to second Router
Router>enable
Router#configure terminal
Router(config)#interface Serial 0/0
Router(config-if)#ip address 192.168.30.2 255.255.255.0
Router(config-if)#no shutdown
Router(config-if)#exit
Router(config)#interface Serial 0/1
Router(config-if)#ip address 192.168.40.1 255.255.255.0
Router(config-if)#no shutdown
Router(config-if)#clock rate 64000
Router(config-if)#exit
Router(config)#int loopback 0
Router(config-if)#ip address 192.168.20.1 255.255.255.0
Router(config-if)#exit
Go to third Router
Router(config)#interface Serial 0/0
Router(config-if)#ip address 192.168.40.2 255.255.255.0
Router(config-if)#no shutdown
Router(config-if)#exit
Router(config)#int loopback 0
Router(config-if)#ip address 192.168.50.1 255.255.255.0
Router(config-if)#exit
Step#2 Now Routing
Go to First Router
Router(config)#router ospf 100
Router(config-router)#net 192.168.10.0 0.0.0.255 area 0
Router(config-router)#net 192.168.30.0 0.0.0.255 area 0
Router(config-router)#exit
Go to Second Router
Router(config)#router ospf 100
Router(config-router)#net 192.168.20.0 0.0.0.255 area 0
Router(config-router)#net 192.168.30.0 0.0.0.255 area 0
Router(config-router)#net 192.168.40.0 0.0.0.255 area 0
Router(config-router)#exit

Step#1 Basic Configuration:-
Go to First Router
Router>enable
Router#configure terminal
Router(config)#interface Serial0/0
Router(config-if)#ip address 192.168.30.1 255.255.255.0
Router(config-if)#no shutdown
Router(config-if)#clock rate 64000
Router(config-if)#exit
Router(config)#int loopback 0
Router(config-if)#ip address 192.168.10.1 255.255.255.0
Router(config-if)#exit
Go to second Router
Router>enable
Router#configure terminal
Router(config)#interface Serial 0/0
Router(config-if)#ip address 192.168.30.2 255.255.255.0
Router(config-if)#no shutdown
Router(config-if)#exit
Router(config)#interface Serial 0/1
Router(config-if)#ip address 192.168.40.1 255.255.255.0
Router(config-if)#no shutdown
Router(config-if)#clock rate 64000
Router(config-if)#exit
Router(config)#int loopback 0
Router(config-if)#ip address 192.168.20.1 255.255.255.0
Router(config-if)#exit
Go to third Router
Router(config)#interface Serial 0/0
Router(config-if)#ip address 192.168.40.2 255.255.255.0
Router(config-if)#no shutdown
Router(config-if)#exit
Router(config)#int loopback 0
Router(config-if)#ip address 192.168.50.1 255.255.255.0
Router(config-if)#exit
Go to First Router
Router(config)#router ospf 100
Router(config-router)#net 192.168.10.0 0.0.0.255 area 0
Router(config-router)#net 192.168.30.0 0.0.0.255 area 0
Router(config-router)#exit
Go to Second Router
Router(config)#router ospf 100
Router(config-router)#net 192.168.20.0 0.0.0.255 area 0
Router(config-router)#net 192.168.30.0 0.0.0.255 area 0
Router(config-router)#net 192.168.40.0 0.0.0.255 area 0
Router(config-router)#exit
Go to Third Router
Router(config)#router ospf 100
Router(config-router)#net 192.168.40.0 0.0.0.255 area 0
Router(config-router)#net 192.168.50.0 0.0.0.255 area 0
Router(config-router)#exit
Now Check Network by sending Package or ping one router to another router as Shown in the Diagram

------------------------END-----------------------------
Router(config-router)#net 192.168.40.0 0.0.0.255 area 0
Router(config-router)#net 192.168.50.0 0.0.0.255 area 0
Router(config-router)#exit
Now Check Network by sending Package or ping one router to another router as Shown in the Diagram

------------------------END-----------------------------
Monday, 11 February 2019
Supernet
Supernet
Supernet is used for to merge multiple route into single
router.
Supernet is create max.7 network
Supernet is covered in into small size network
Supernet create in 4 step’s
1. First convert all ip into binary
2. Now set the end operation end operation condition’s. operation are
a. all bit is
one then output is one
b. all bit is
zero then output is zero
c. if one bit
is one and second is zero then output will zero
3. After set end operation now create new ip
4.Count common bit and create subnet mask
For example
172.16.111.0
172.16.112.0
172.16.113.0
1. Now convert it into binary.
10101100
00010000 01101111 00000000
10101100
00010000 01110000 00000000
2. Now set the end operation end operation condition’s and create new ip
10101100 00010000 01101111 00000000
10101100 00010000 01110000 00000000
————————————————————————
10101100 00010000 01100000 00000000
ip-- 172 16 96 0
s-mask 255 255 224 0
3. new ip and subnet mask for class C are:-
ip -- 172.16.96.0
subnet mask -- 255.255.255.224
For Basic configuration, clock rate and summarization (click here)
or for big network (click here)
Subscribe to:
Posts
(
Atom
)


